Where Do I Upload the Google Html Verification File
Verify your site ownership
What is verification?
Verification is the process of proving that you own the property that you claim to ain. Search Console needs to verify ownership because verified owners take access to sensitive Google Search data for a site, and tin can impact a site's presence and behavior on Google Search and other Google properties. A verified possessor tin can grant full or view access to other people.
VERIFY YOUR Belongings
Verify a website belongings
- Either add a new holding or cull an unverified property from your holding selector.
- Choose one of the verification methods listed beneath and follow the instructions. The verification page will listing which methods are bachelor and recommended for your site.
Using multiple verification methods
Y'all can add multiple verification methods in your property's verification settings page. You might want to add together more than than one verification method in example one of your existing verification methods fails (for case, if you lot verified using a Google Analytics tracking code, and someone changes a template on your website that omits the tag).
To add an additional verification method, visit the Settings folio for the belongings and click Ownership verification
Multiple people tin verify ownership of the same website property, using the same or different verification methods. If you utilize the same verification method, just be sure that y'all don't overwrite the verification tokens of any other owners.
Verifying child backdrop
One time you have verified a holding, you can create and verify child properties very easily with the aforementioned verification method with little additional work. That is, if you accept verified ownership of example.com using the HTML file upload method, any child properties that yous create will be auto-verified using the same method.
How long does verification concluding?
Verification lasts as long every bit Search Console can confirm the presence and validity of your verification token. Search Console periodically checks if your verification token is still nowadays and valid (for example, past checking if your HTML verification tag is still present). If verification can no longer be confirmed, you volition be notified. If the upshot is not fixed, your permissions on that property will expire after a sure grace period.
If all verified owners lose admission to a property, all users with total view permissions will and then lose admission to the Search Console property.
The user amanuensis that performs HTML tag verification has the user agent token Google-Site-Verification and the full user agent string Mozilla/5.0 (compatible; Google-Site-Verification/1.0)
When will I start to come across data?
Data is collected for a property as soon as anyone adds information technology in Search Panel, even earlier verification occurs.
We lost our just verified site owner!
If the but verified possessor of your site leaves your squad, yous should verify ownership to maintain (or regain) admission to the belongings.
If yous are taking over a site from another owner, after you verify ownership you can unverify previous owners by removing their verification token (for instance, removing the HTML tag from the site, for HTML-tag-verified owners). See Add or remove owners for more than information.
Choosing a verification method
Search Panel supports several different verification methods. See the table below to assistance choose a method that works all-time for you lot.
| Method | Notes |
|---|---|
| HTML file upload | Relatively simple, but requires the ability to upload a file and publish information technology on your site at a specific URL. Might not be possible on a site hosting platform. |
| HTML tag | Relatively simple, but requires the ability to edit the HTML source code of your site's homepage. Might not be possible on a site hosting platform. |
| Google Analytics tracking lawmaking | Simple, if the folio already has a Google Analytics tracking code for a Google Analytics account that you can admission. If the page does not have a tracking code, you must must add one (which may require creating a Google Analytics account if you lot don't already take one). |
| Google Tag Managing director | Simple if the page already has a Google Tag Manager snippet for a Google Tag Manager account that y'all can access. If the page does not have a snippet, you must must add i (which may crave creating a Tag Manager business relationship if y'all don't already have one). |
| Google Sites, Blogger, or Domains business relationship | Utilise the recommended method for each platform. |
| Domain proper noun provider | More complex, but is the merely mode to verify a Domain property. If your domain provider is listed in the verification wizard, so this is a uncomplicated procedure. Domain backdrop are useful considering they include information for all protocol (http/https) and subdomain variations of your property. |
Verification method details
Sites that use a website hosting platform
If yous use a website hosting platform like WordPress, Wix, or SquareSpace, you might be limited in which verification methods are available to you. Or, conversely, your platform might provide a special plugin or setting to verify your property on Search Console.
If yous're using a CMS, endeavour these steps before trying ane of the verification methods listed on this folio:
- Search your site host's documentation for Search Console verification information. For instance: "Wix Search Console verification" or "Weebly Search Panel verification".
- Search for plugins on your platform that can handle verification for you. For example, Site Kit for WordPress can handle verification for yous, and also provide simplified views of your Search Console data. Note that Site Kit is the only plugin that is officially sponsored by Google, so do a piffling research on any plugin earlier you install it.
HTML file upload
HTML file upload for site ownership verification - Google Search Console Preparation
You can verify buying of a site by uploading a special HTML file to a specific location on your site. This file is tied to a specific user. Follow the instructions on the verification details page. Removing this verification file from your site will cause you lot to lose verification for the site.
⚠️ Requirements
- The file cannot require authentication. The directory where you upload your HTML file must be bachelor to non-logged-in users. You tin test this past trying to visit your file in an incognito window in your browser.
- You must be able to upload a file to the root directory of your website, where it will be available to web browsers. If you do not have permissions to exercise this, try some other verification method. If you are using a website hosting platform, yous might demand to search your service's help pages to see if this is possible.
- HTML file upload tin be used for URL-prefix properties, but not Domain properties.
Steps
To verify ownership using an HTML file:
- If you are using a website hosting platform, search your service's help pages for custom instructions to verify your site on Search Console. If you don't find whatever information, then proceed on to the side by side steps.
- Read the requirements for this verification technique.
- Choose the HTML file upload method on the Buying verification page for your property.
- Download the provided verification file. This file is unique to you; it cannot exist used to place anyone else, and is associated with your Gmail account.
- Upload the verification file to your website so that it will be exposed in the location that was specified in the verification details page. This is typically the root directory for your property. (That is, if you divers your property as https://case.com, and the file provided is named 1234.txt, then the file should be saved and browsable at https://example.com/1234.txt.) Search Console does non follow redirects when looking for this file. You lot can add newlines at the finish of the file body, if required, simply do non otherwise modify the file name or content.
- Ostend that you can run into the file by visiting information technology in your browser in the location specified by the Search Panel verification magician. If the file isn't available to your browser at that URL, Google won't be able to find for verification purposes.TIP: Use an incognito window in your browser to ostend that you don't need to log in to access it.
- Complete verification by clicking Verify in the verification details page.
- If verification fails, run across Potential errors beneath to troubleshoot the issue.
Potential errors
The post-obit errors can occur with HTML file upload verification:
- Your verification file was not found.
Please download the verification file provided on the Verification folio of Search Console, and upload information technology to the specified location without any modifications. If the file proper noun or content does not lucifer the HTML file provided, we won't exist able to verify your site ownership. - Your verification file has the wrong content.
Search Panel checks to see if your verification file has the aforementioned filename and content as the file provided on the Verification page. If the file proper noun or content does not friction match the HTML file provided, we won't be able to verify your site ownership. Please download the verification file provided on the Verification page of Search Console, and upload it to the specified location without whatever modifications. - Hacked verification file.
Your verification attempt failed in a way that indicates that your site might have been hacked. Learn more than about detecting and fixing hacked sites. - Your verification file redirects to a disallowed location.
Google will not follow redirects to another domain for verification files. Redirects within a single site—for example, fromhttp://instance.com/tohttp://www.instance.com/—are allowed. If your site redirects all traffic to another site, we recommend using HTML tag verification instead. - Additional common verification issues are listed beneath.
HTML tag
HTML tag for site ownership verification - Google Search Console Grooming
You tin verify your ownership of a site by adding a <meta> tag to the HTML of a specified page. We'll verify that the meta tag exists in the right location. If we can't detect the tag, we'll give you information about the error we encountered. This tag is tied to a specific user. Search Panel volition periodically check for the presence of this tag.
⚠️ Requirements
- Your homepage cannot require authentication. The site homepage must be available to not-logged-in users.
- You must exist able to edit the HTML source code of the site'south homepage straight. Specifically, you lot must be able to insert a tag into the <head> tag on your homepage. If yous exercise not have permissions to do this, try another verification method. If y'all are using a website hosting platform, yous might need to search your service's help pages to see if this is possible.
- Can be used for URL-prefix properties, only not Domain properties.
Steps
To verify ownership using an HTML tag:
- If you are using a website hosting platform, search your service'south assistance pages for custom instructions to verify your site on Search Panel. If you don't find whatsoever information, then go on on to the side by side steps.
- Read the requirements for this verification technique.
- Choose the HTML tag method on the Ownership verification folio for your belongings.
- Copy the tag from the Search Console verification sorcerer into the <head> section in the HTML of your site's not-logged-in dwelling page (run into note). Example:
<head>
                        <championship>Case.com homepage</championship>
                        <meta proper noun="google-site-verification" content="......." />
                        </head>
This tag is unique to you lot; it cannot exist used to place anyone else, and is associated with your Gmail business relationship. - Save your page. Ostend that the tag is present in your live page past visiting the page and looking for the tag in the page source lawmaking. (PressControl + F then search for "google-site-verification" in the page source to detect the tag.)
- Complete verification by clicking Verify in the verification details folio.
- If verification fails, run across Potential errors below to troubleshoot the effect.
Potential errors
The following verification errors can occur with HTML tag verification:
- Meta tag not found/in the wrong location. The verification meta tag must exist inside the <caput> section of the page. If you see these errors, bank check the following:
-
Is the meta tag on the right page? Nosotros look for it on your site's domicile page. This is the page that your server returns when someone requests your site (such equally http://www.case.com/). This folio is often named index.html or index.htm, simply could exist named differently, depending on your server'south configuration.
- Is the meta tag in the correct place on the folio? We look for information technology in the page's
<head>department. An example of correct placement is shown here:<html> <head> <title>Your Page Title</title> <meta proper name="google-site-verification" content="your verification string"> </head> <trunk> ... - If you're using a spider web editor or a WYSIWYG editor to edit your folio, brand sure you're editing the HTML of the live page, non simply the local copy on your estimator.
-
- Your meta tag is wrong.
We found the verification meta tag, but the contents were wrong. To avoid errors, copy and paste the meta tag provided on the Verification page of Search Panel. If another user'southward verification tag was already nowadays in the page, you might get this mistake; confirm that the exact tag given to you lot in the Search Panel verification wizard is nowadays in the page HTML. - Additional common verification problems are listed below.
Domain name provider
DNS tape for site ownership verification - Google Search Console Grooming
Domain verification is required to verify a Domain property, but can likewise exist used to verify a URL-prefix property. This verification method involves submitting a record into your domain proper name provider's record listing. This method may require you to be comfortable with a little scrap of technical cognition.
Yous can verify ownership of subdomains or root domains. Verifying ownership of a root domain verifies ownership of all subdomains, just verifying ownership of a subdomain does not verify ownership of a parent domain. For example: verifying buying of m.example.com also verifies buying of pets.m.case.com, but does not verify ownership of example.com.
⚠️ Requirements
- You must have a custom domain name, or command your domain proper name.
- Yous must be able to log into your domain name provider.
Steps
To verify ownership via your domain proper noun provider (the company that you purchased your domain name from):
- If you are using a website hosting platform, search your service'south assistance pages for any custom instructions on verifying your site on Search Console. (Tips for finding your DNS provider, if you don't know who information technology is.) If you don't notice a custom solution on your provider's page, so continue on to the next steps.
- Choose the Domain proper name provider method on the Ownership verification page for your property in Search Console. (This will be called automatically when you create a Domain holding.)
- See if your Domain proper name provider is listed in the provider names dropdown listing:
- If it is listed, choose your provider and click Start verification and follow the instructions provided in the dialog box. Yous volition be required to log in to your domain provider, later on which verification should occur immediately.
- If it is non listed, cull Any DNS provider and follow the transmission domain proper noun provider instructions below.
Transmission domain name provider instructions
If your domain name provider is not listed in the Domain name verification dialog, y'all will need to manually add a DNS record. This DNS record is a proper noun/value pair provided past Search Console. Let's become started:
Determine which DNS tape format to use. You must employ either a TXT record or a CNAME record, depending on how your site is configured. To make up one's mind which format you must utilise:
- Open the Google Admin Toolboxin the CNAME tab
- Enter your property'southward domain name. This is the role between "https://" and the path: For the property "https://www.example.com/" the domain name would be "world wide web.example.com".
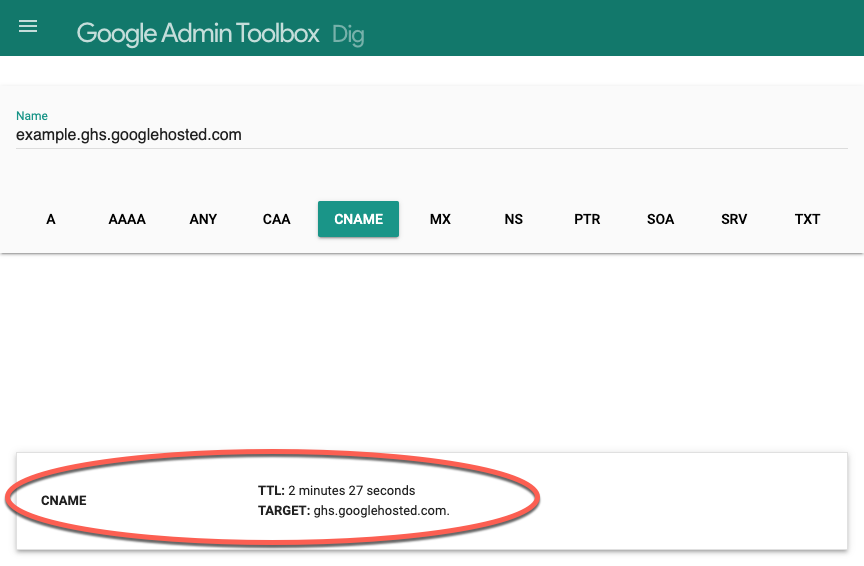
- Look at the output:
- [Most common case]If you see " Record not found!" then follow the TXT record instructions.
- If a CNAME tape appears, and theTarget value is a parent domain of the domain that you entered, then you should follow the CNAME record instructions.
TXT DNS record instructions
- Generate a unique TXT verification record: When asked to verify your property in Search Console, choose the Domain name provider method and Search Panel will give you a string value TXT record to use in the adjacent step.
- Add your DNS record to your domain provider:Add together the TXT record that Search Console gave you in the previous step to your domain provider'southward records by following these steps:
- Notice the Google Workspace documentation for your provider.
- Ignore Google Workspace step 1 (Get your unique verification record) because you already generated your TXT tape in Search Console.
- Sign in to your domain host (typicallyGoogle Workspace Step 2 ).
- Add together your Search Console TXT tape to your domain's DNS records (typically Google Workspace Pace three):
- For theHost/Name property,either leave this blank, or set every bit "@", as described in the documentation for your DNS provider.
- For the Value belongings, provide the Search Console TXT record string that you generated earlier.
- Ignore Google Workspace pace 4 (the verification step) and go on with stride 4 below.
CNAME DNS record instructions
- Generate a unique CNAME verification record
- Open up Webmaster Central. Don't use the TXT record from Search Console. You'll demand to use Webmaster Fundamental to generate a DNS record.
- If your property is in the list on Webmaster Central:
- Select the belongings.
- ClickVerify using a different method
- If the property is not in the listing on Webmaster Central:
- Click Add a property in Webmaster Central, above the property list.
- Enter your bare host name (that is, case.com, not http://instance.com).
- Click Continue.
- Select Alternate methods
- If your property is in the list on Webmaster Central:
- SelectDomain name provider.
- Choose your provider from the list, or select Other.
- Click Add together a CNAME record to generate your DNS CNAME record.
- Open up Webmaster Central. Don't use the TXT record from Search Console. You'll demand to use Webmaster Fundamental to generate a DNS record.
- Add the DNS record to your domain provider:
- Find the Google Workspace documentation for your provider
- Ignore Google Workspace pace 1 (Get your unique verification record) because you already generated your CNAME record in Search Console.
- Sign in to your domain host (typicallyGoogle Workspace Step 2 ).
- Add your CNAME verification record to your domain'due south DNS records (typically Google Workspace Footstep 3)using the tape you got from Webmaster Fundamental. Provide both the record proper noun and tape value in the appropriate fields on your DNS provider'due south site. You can use the default TTL value suggested by your provider.
- Ignore Google Workspace step 4 (the verification step) and continue with step 4 below.
- Complete your buying verification by clicking Verify in the Search Console verification details page. Of import: For manually installed records, it can have up to two or three days for your provider to start serving the tape. If y'all have followed the Transmission domain name provider instructions above and verification fails, wait a 24-hour interval or two and try once again. Encounter the Potential errors section for troubleshooting, or to larn how to encounter whether your domain name provider is serving your tape even so.
Important: To stay verified, don't remove the DNS record from your provider, even after verification succeeds.
Troubleshooting and potential errors
To see which records are served by your domain name provider:
- Visit the Google Admin Toolbox
- Type your domain name into the box at the top, without the protocol or any slashes (that is, enter case.com, not https://example.com).
- Click either TXT or CNAME, depending on what tape type you are using for verification. (Most sites apply TXT records for domain verification.)
- All DNS records of the selected type plant on your provider will exist shown at the bottom with a label describing the record type (typically, either CNAME or TXT).
- Look in the listing of records for the DNS record issued to you lot by Search Console.
- For TXT records, a Search Console verification record looks something like
google-site-verification=<<some number>>. - For CNAME records, the verification tape is a name/value pair where the name includes your belongings domain, and the value includes
dv.googlehosted.com.
- For TXT records, a Search Console verification record looks something like
- If you don't see your credentials listed, wait a day or ii, then try again.
To see your DNS record afterwards yous've verified your property using the DNS method:
- Open up Webmaster Central
- Click your property proper name in the listing of backdrop to meet a list of verification methods for the property.
- Adjacent to either DNS TXT record or DNS CNAME record, click Details to come across your record value.
- If you like, you tin can also run into all records being served by your domain name provider using theGoogle Admin Toolboxevery bit described above.
The post-obit verification errors can occur with DNS record verification:
- Your verification DNS TXT record was not found
Your verification TXT record was not found. It can take a few minutes or even days after posting the record for it to be visible to Google; wait a solar day or two then try again. - Your verification record did non match
No verification records on your DNS provider matched the value given to y'all by Search Console. Exist sure to use the record provided by the verification folio. For a TXT record, y'all should leave the name/host field blank and use your TXT string in the DNS record'southward value field. For a CNAME record, you are given a proper noun/value pair to use in your DNS record's name/value fields. - Additional mutual verification bug are listed below.
Google Analytics tracking lawmaking
Google Analytics for site ownership verification - Google Search Console Grooming
If y'all use Google Analytics to rail your site's traffic, you can verify your site using the Google Analytics tracking code used in your Search Console holding.
⚠️ Requirements
- Your homepage cannot require authentication. The site homepage must be bachelor to non-logged-in users for verification. Additionally, any pages that crave authentication to reach probably won't appear in Search ofttimes, and so they won't accumulate pregnant Search data.
- Yous must have "edit" rights for the Google Analytics business relationship used by that page. In Google Analytics 4, the verification code is associated with a Google Analytics stream. For earlier versions of Google Analytics, the verification code is associated with a Google Analytics Spider web Property.
- You must employ the aforementioned Google account for both Search Panel and Google Analytics.
- Your not-logged-in homepage (see notation) must incorporate either the analytics.js or gtag.js snippet. The tracking code must be in the
<caput>section, not the<body>section, of your page. To ostend the presence of this tag, visit the page in your browser, view the page source, and search for the snippet. - Use the code exactly as provided; do not modify it. If y'all modify it, verification will neglect.
- Tin be used for URL-prefix properties, just not Domain backdrop.
Steps
To verify ownership using a Google Analytics tag:
- Open Search Console using the aforementioned Google account that has edit access in Google Analytics.
- Read the requirements for this verification technique.
- Choose Google Analytics in the verification details page for your site and click Verify.
- If verification fails, come acrossPotential errors below to troubleshoot the consequence.
Note
- The Google Analytics tracking code is used only to verify site ownership. No Google Analytics information will be accessed.
Potential errors
The following verification errors tin can occur with Google Analytics tracking lawmaking verification:
- Snippet not found
Did y'all put the snippet in the correct location of the home folio? Does the not-logged-in homepage incorporate your snippet? - Malformed snippet
Be sure to employ the snippet exactly as provided. - Wrong snippet found (onetime Google Analytics snippet)
Search Panel supports only the latest version of the Google Analytics snippet. - Wrong snippet type (Tag manager/tertiary-party tag manager)
Be sure that you lot are using your Google Analytics snippet. - Snippet in wrong location
The snippet must exist in the<head>section of your dwelling page. - You don't have a Google Analytics business relationship / Insufficient permissions
You lot must have a valid Google Analytics account and you must take Edit permissions on that account. - Boosted mutual verification bug are listed below.
Google Tag Manager container snippet
Google Tag Director for site buying verification - Google Search Console Training
If you have a Google Tag Managing director business relationship active on your site, yous can verify ownership of your site using your Google Tag Manager container snippet code.
⚠️ Requirements
- Your homepage cannot require hallmark. The site homepage must be bachelor to non-logged-in users for verification. Additionally, any pages that require hallmark to attain probably won't announced in Search oftentimes, and then they won't accrue significant Search information.
- You must take Publish permission for the Google Tag Manager container on the page.
- You must use the same Google business relationship for both Search Console and Google Tag Director.
- Your non-logged-in homepage (meet note) must incorporate the right tag in the correct location. The
<noscript>portion of the Tag Manager code must exist placed immediately after the opening<body>tag of your folio. If it is not, verification will neglect. You cannot insert a data layer (or anything other than HTML comments) between the<body>tag and the Tag Manager lawmaking. To ostend the presence of this tag, visit the folio in your browser, view the page source, and search for the snippet. - Use the code exactly as provided; practise non change it. If you alter it, verification will fail.
- Tin can be used for URL-prefix properties, but not Domain properties.
Steps
To verify buying using a Google Tag Manager tag:
- Open Search Console using the aforementioned Google account that has edit admission in Google Tag Director.
- Read the requirements for this verification technique.
- Choose Google Tag Manager in the verification details page for your site, and follow the instructions shown.
- If verification fails, run intoPotential errors beneath to troubleshoot the issue.
Potential errors
The following verification errors can occur with Google Tag Managing director verification:
- Snippet not found
Did yous put the snippet in the right location of the home folio? Does the non-logged-in homepage contain your snippet? - Insufficient permissions
You lot need Publish permission on your Google Tag Manager container. - Wrong tag
Exist certain that you are using the proper tag associated with the business relationship used to sign in to Search Panel. - No tag director container
Yous haven't created any containers in your Tag Manager account. - Tag not institute / wrong location
Be sure to put the tag on the proper folio and location, as described above. - Additional mutual verification issues are listed beneath.
Blogger
Blogger for site ownership verification - Google Search Console Preparation
New blogs that you create in Blogger should exist added and verified automatically in your Search Console business relationship. If your blog doesn't appear automatically on the Search Console habitation folio, add the property and information technology should be verified automatically.
⚠️ Requirements
- Older blogs are non automatically verified, and should be verified using the HTML tag method.
- Be sure that you are logged in to Search Console with the same account used to manage your blog.
Google Domains
If you've registered a domain with Google Domains, any property that y'all register on that domain should be verified automatically when y'all add together it to Search Panel.
Where should I put my verification tag?
If y'all are using a tag-based verification method (Google Analytics, Google Tag Manager, or the HTML <meta> tag methods), Search Console will look for your verification tag in the page to which a non-logged-in user is redirected when visiting the URL that defines your property.
Example
If yous define your property as https://example.com, and whatsoever non-logged in user who types that URL in their browser is redirected to https://instance.com/home, then Search Console will look for your verification tag in the folio https://example.com/home.
For other verification methods, such as the file upload method, redirects are not followed.
Common verification errors
In addition to any method-specific verification errors, the following verification errors are possible in most verification methods:
- Incorrect tag/snippet/file errors
Be sure to use the verbal tag, code snippet, or file provided to you when beginning verification. - The connexion to your server timed out.
We were unable to verify your file considering nosotros received a server timeout. This could be because your server is downward or is busy and responding slowly. Brand sure that your server is responding and try again. - We encountered an error looking up your site's domain name.
We tried to access your verification file, but were unable to access your domain due to a DNS error. This could be considering your server is downwardly, or there is an result with the DNS routing to your domain. Make certain that your domain is resolving correctly and endeavour once again. - The download request was redirected too many times.
Check the URL for potential issues, such as an space loop. - Your server returned an invalid response.
This can happen if your site is requires password authentication, or if we cannot admission it for other reasons. - Nosotros were unable to connect to your server.
Make sure that your server is non down, and that your domain is resolving correctly, and effort again. - An internal error occurred.
If this problem persists, check the Webmaster Central Assistance Forum for updates. - Timeout
Either your site or the domain server stopped responding to our requests (depending on the verification method used). Confirm that your site is responding, and then attempt over again. - Could not find your domain
We tried to resolve the site URL that you gave the states, just it is unknown to the DNS service. Check that you are providing the correct URL for your property.
Was this helpful?
How can nosotros ameliorate information technology?
Source: https://support.google.com/webmasters/answer/9008080?hl=en
0 Response to "Where Do I Upload the Google Html Verification File"
Post a Comment